The Consultant Check substage facilitates listening to the target-language translation of a section and its back translation (if enabled) and the transcription of that back translation (if enabled) along with the audio Bible references for that section. See the Render Helpdesk article titled Configure Workflow—Settings for Stages for all of the settings available in this substage. This role can be performed by both Local and Global User accounts.
Consultant Check
To begin a checking session, select the icon from the Project Home page. With the advent of Render version 3.13, Render will open and load the default scope of your currently loaded project. The scope name (1) appears to the right of the Scope Select icon (2). When the Scope Select icon is yellow, it means that there are sections in another scope in this project that are ready for you to check. 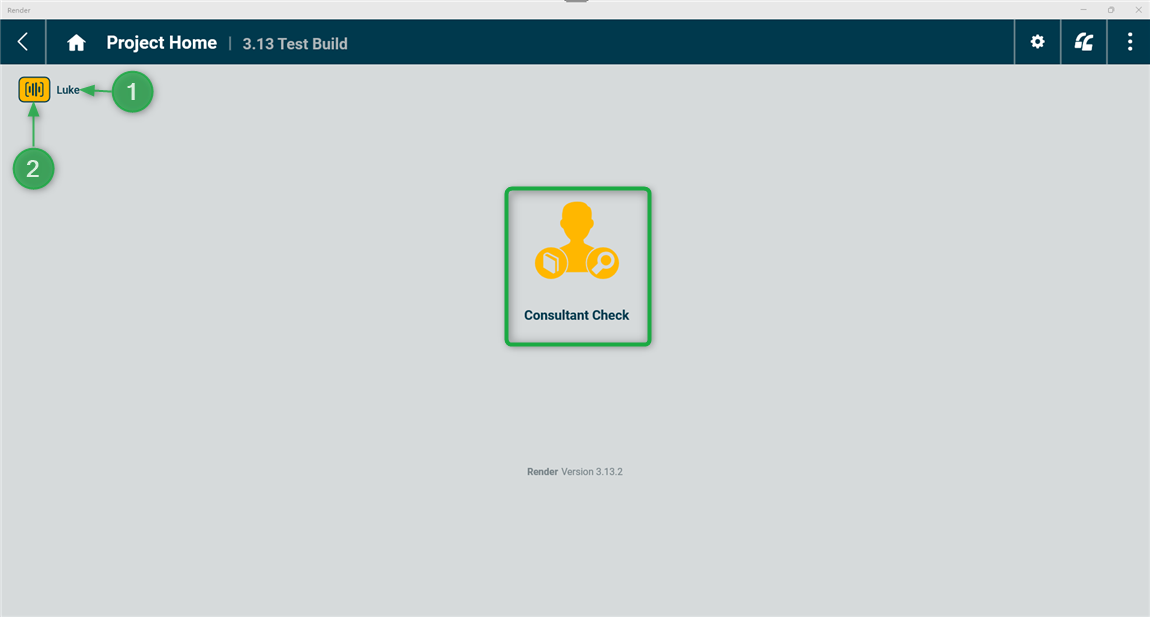
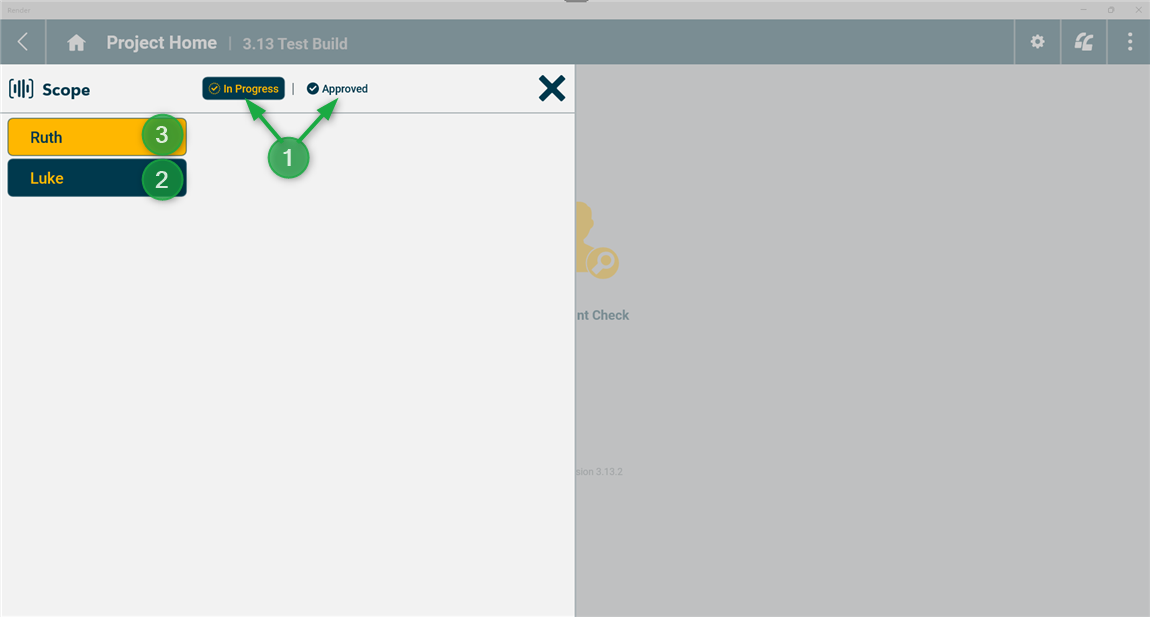
To change Scopes, click/tap the Scope Select icon (2) to open the Scope Select Window (below) where you will see the other scopes in the "In Progress" tab. When a scope is completed, it is moved to the "Approved" tab.
Those scopes with a yellow background have work for you to do (both scopes in this example below have work for this user). The scope with blue background and a yellow name is the currently selected scope (2). Selecting another yellow scope (3) will close the window and load the data of that scope. This will become the default scope for you until you change back using the Scope Select tool.
Section Select
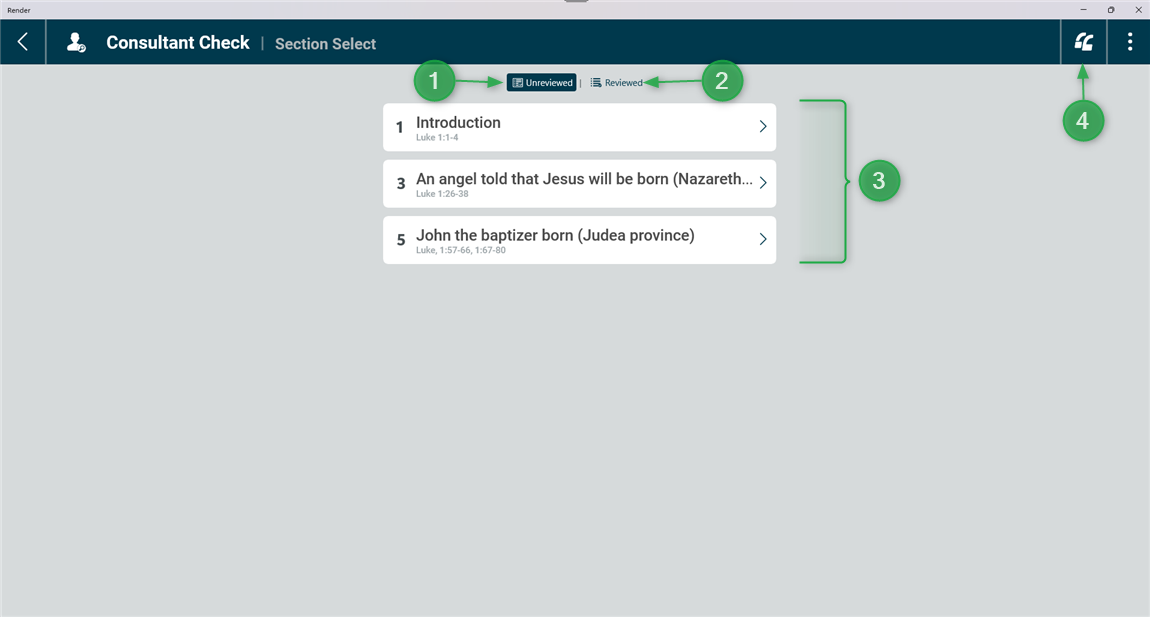
1. Unreviewed tab: lists all the sections that are available for Consultant Check.
2. Reviewed tab: lists sections that have been reviewed at least once. These drafts have been checked and sent back to the translation teams for revision.
3. Available sections: select one of the available sections to begin the Consultant Check process.
4. Project home: select to return to the Project Home page.
Original Language - Full Section
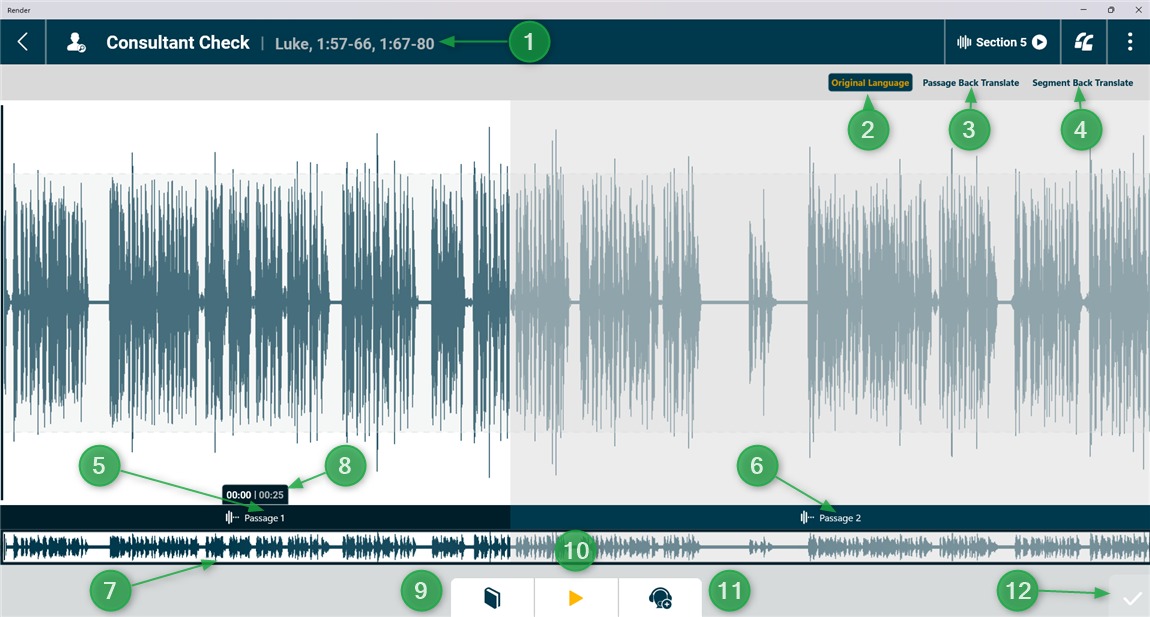
- Section Reference: shows which verses each passage in the section covers. In this example, Section 5, Passage 1 is Luke 1:57-66 and Passage 2 is Luke 1:67-80.
- Original Language: this tab allows the user to listen to the current translation draft. The "Original Language" tab is currently selected in the screenshot above. Please note: "original" does not refer to the Biblical languages. It is understood in Render to refer to the target-language. Thus, "original language" is the same as "target language."
- Passage Back Translate (optional): if enabled, this tab allows the user to listen to the passage-style back translation.
- Segment Back Translate (optional): if enabled, this tab allows the user to listen to the segment-style back translation. Currently in Render 3, there is no separation of passages in Segment Back Translate.
- Active Passage: the active passage has a whiter background and darker blue waveform.
- Non-active Passages: have darker grey background and lighter blue waveform.
- Scrollbar/slider: for sections with many or long passages, this scrollbar/slider enables you to move anywhere in the section recording.
- Time stamp/duration indicator: this shows you the time stamp of the scrubber/cursor position (currently 00:00 in the screenshot) in the active passage, and the overall active passage duration
- Audio Bible References: select this button to bring up audio references for this section on the left of the screen. Select a second time to hide the references.
- Play: plays the audio from the selected tab (Original Language, Passage Back Translate, or Segment Back Translate)
- Add Note: see How to: Record a Note for details on how to add a note.
- Notes can only be added to the Original Language draft. *
- Problem: When a Checker is listening to Back Translations and wants to make a note to the translation team, it is difficult to identify the right location on the original language draft to place the note because there is no connection between the two audio files.
Workaround: One option is to simply guess at the relevant location in the draft that corresponds to the issue discovered in the back translation and to place a note at that location. A second option is to place all notes at the beginning or the end of the passage, and for each note include information about where in the draft the note relates. Be sure to place the notes of a passage in that passage, and not at the beginning or ending of the Section. Please do not place notes for one passage on another.
- If a note is added on any passage, the section will be sent back to the translation team and will appear in the Consultant Revise stage.*
- If no notes are added, the section will move forward to the next stage in the workflow.
12. Next/Finished: Marks the Check as complete and return to the Consultant Check: Section Select page.
* If the note is recorded in audio form, there is the option for the back translator to interpret the note before it is sent to the translation team. This can be configured in the Workflow Configuration settings (the "Include Note Interpret" feature must be turned on). However, if the note is typed then it will go directly to the team without interpretation.
Passage Back Translate
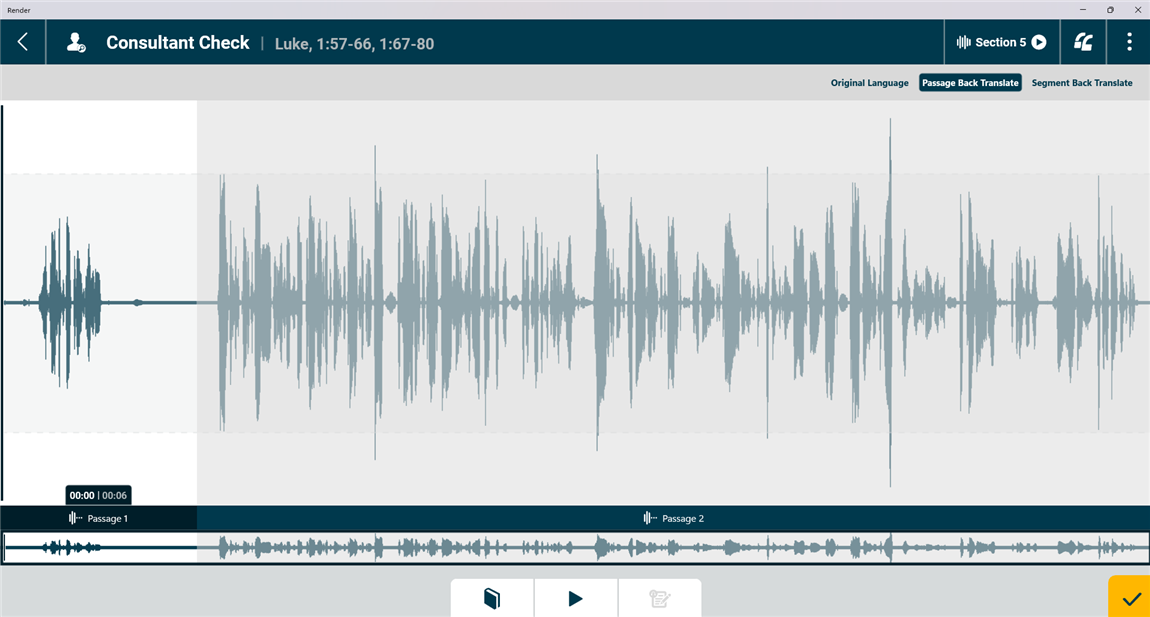 Notice that:
- each passage of the section is distinctly visible.
- you cannot make notes on the Back Translations. Notes can only be made on the Original Language view (above).
- the Next/Finish button turns yellow as soon as you finish playing the audio. Make sure, however, to complete your checking work for the entire section before clicking/tapping the Finish button.
Segment Back Translate
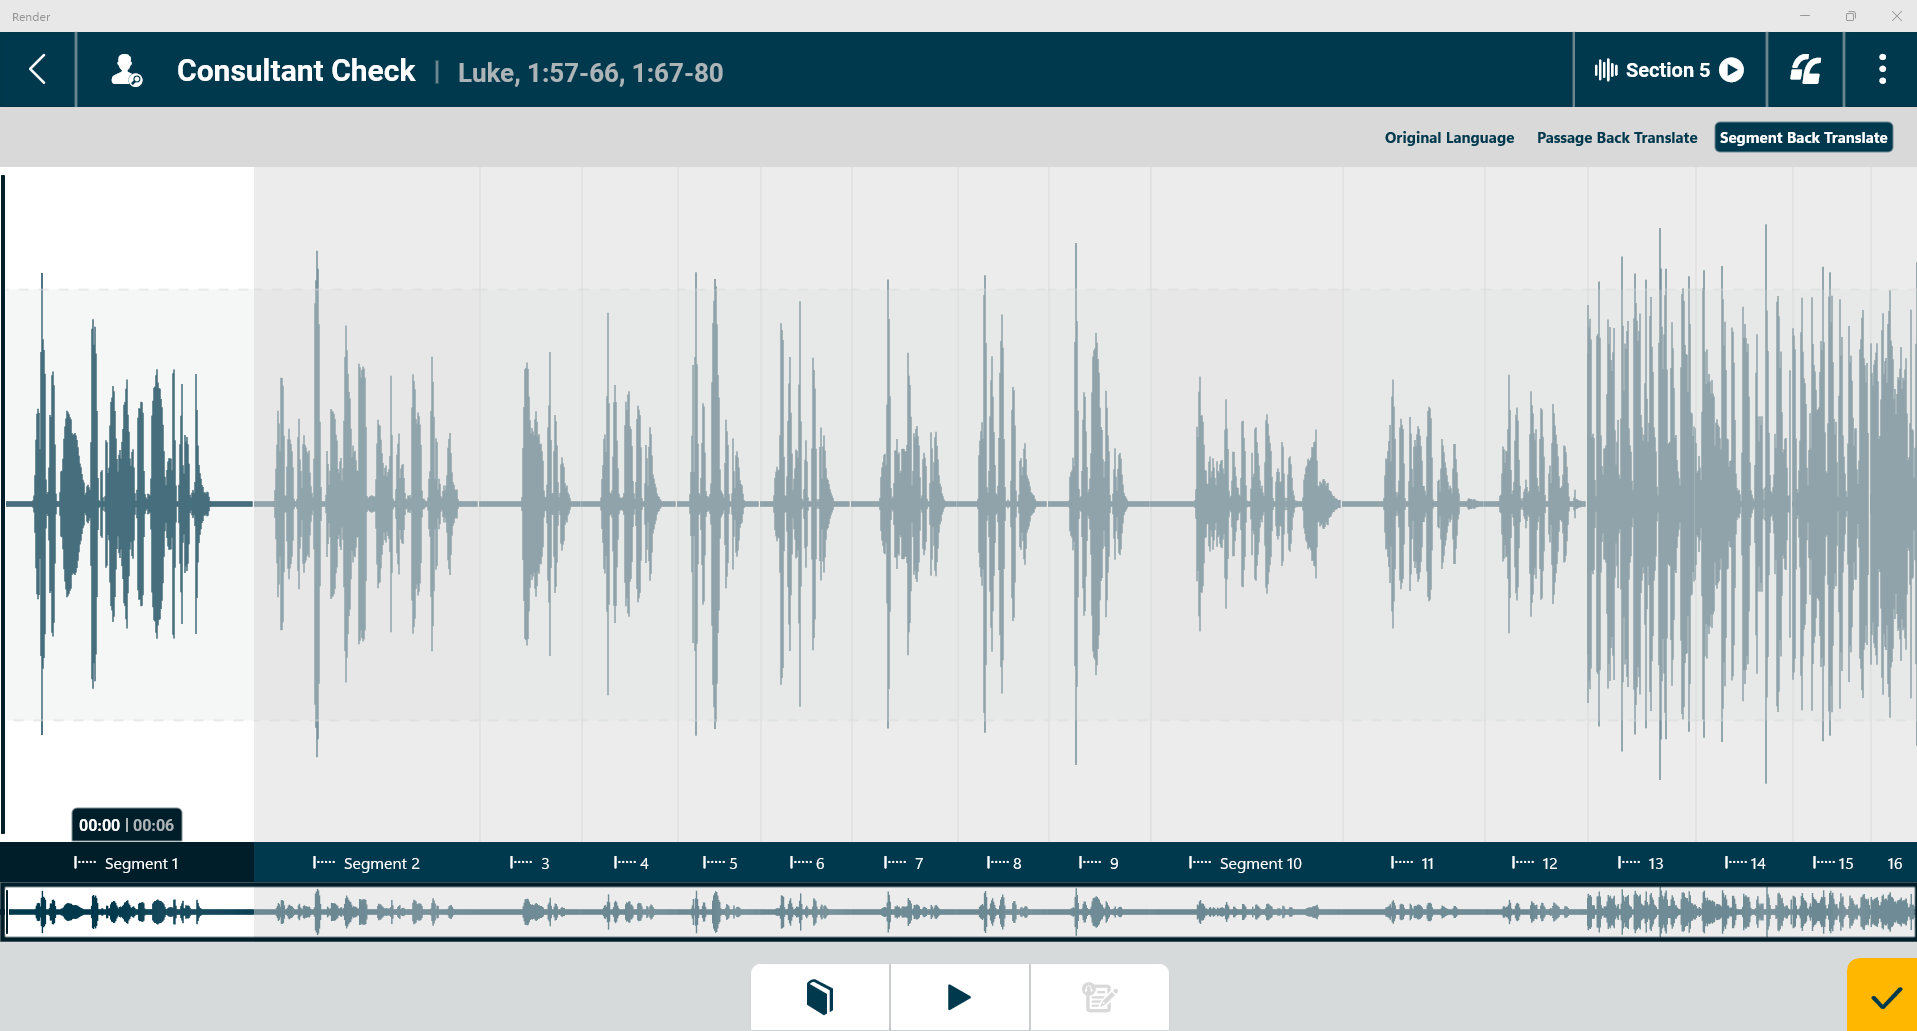
Notice that Segment Back Translation presents all the segments of the entire section and does not distinguish by passage.
Was this article helpful?
That’s Great!
Thank you for your feedback
Sorry! We couldn't be helpful
Thank you for your feedback
Feedback sent
We appreciate your effort and will try to fix the article