Draft Stage is where you record the first audio draft of your translation.
In Render 3, the Draft Stage is locked as the first step of the translation workflow. Settings within the Draft Stage can be altered but the stage itself cannot be removed. This article is based on default settings within the stage. The symbol * is used throughout the article to inform you of possible variations in configuration:
* This page/feature can be turned off in Project Configuration if desired. Be advised that if you turn off both Section Review and Passage Review then you will lose the ability to record notes on the passage.
Tap on the Draft icon from the Project Home page:
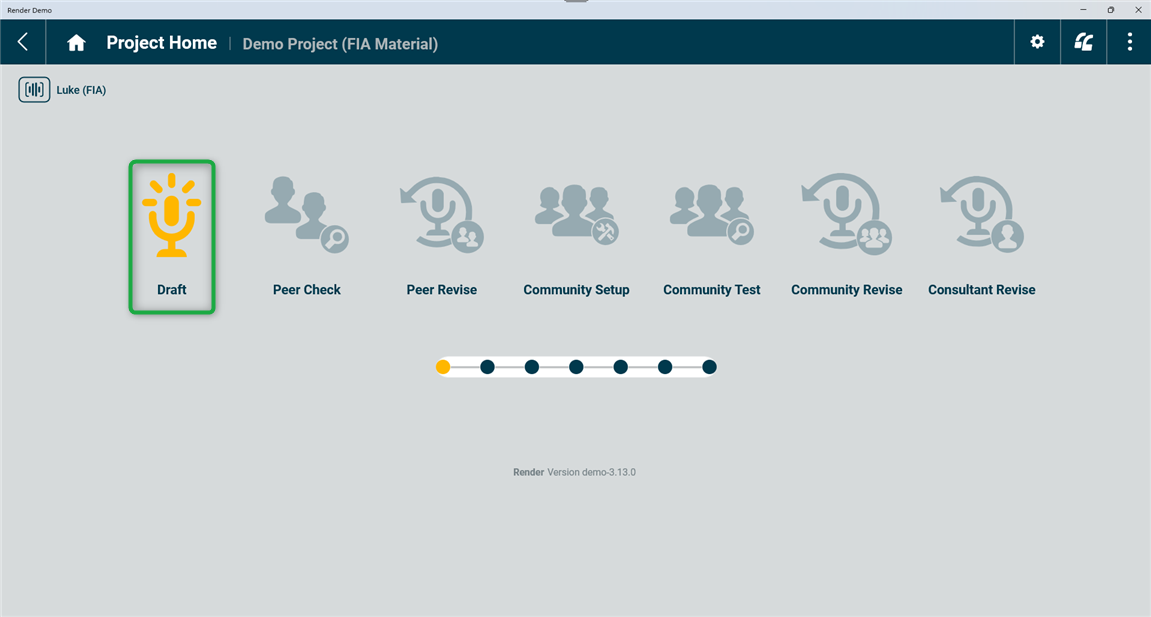
The Section Listen page will open (see below). On this page, the Section with the highest priority will be loaded into the player. A Section has one or more Passages. Listening to the entire Section gives you the context needed for understanding each Passage in the Section. Passages are put together in a Section because they are related by a theme.
Draft: Section Listen*
- References: Full Section audio for up to four reference Bible versions.
- Section number and audio title: If the title audio has been added to your project, a play button will be displayed. Tapping it will play the Section title audio.
- Home: Tapping this brings you to your Project Home page (see first screenshot above).
- Menu: Project Home, Section Status, Export Audio, Project List, Sync, and Log Out
- Back: Tapping this will either bring you back one page (if possible) or return you to your Home page.
- Next: When Section Listen Guidance* is turned on (yellow color), this Next button is inactive (grey color) until the Reference audio has been played. At that time, the Next button becomes dark blue and active. Tapping it will cause Render to proceed to the next screen.
Draft: Passage Listen*

- References: In the Passage Listen page, these players play the audio for this passage only; not the entire Section.
- Passage number: Drafting is done one passage at a time.
- Next: When Passage Listen Guidance* is turned on (yellow color), this Next button is inactive (grey color) until the Reference audio has been played. At that time, it becomes dark blue and active.
Draft: Draft Record
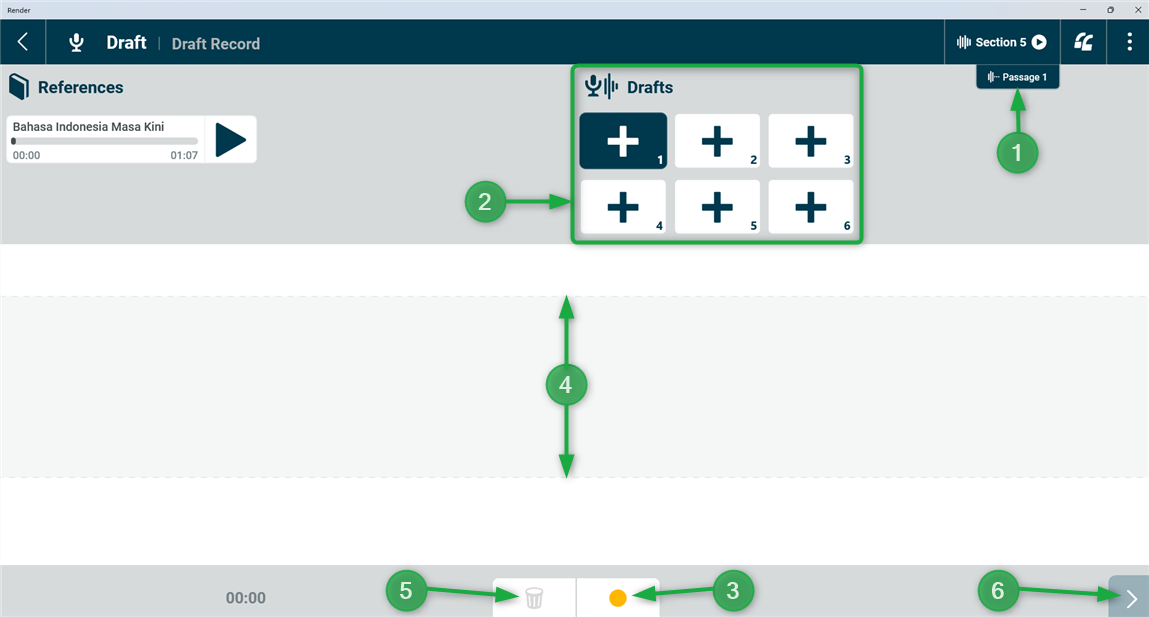
- Passage number: When a passage has been divided (see How to use the Passage Divide Tool), the number will appear in the form "Passage 1.1". Be aware that all desired divisions for the passage must be made before any drafting is completed. If the Passage was divided into three pieces, your Passage numbers would be X.1, X.2 and X.3 where X is the original number of the Passage. Each of these sub-passages must be translated one at a time, just like Passages.
- Drafts (up to 6): Dark background is the active or selected draft. Others are inactive or unselected.
- Record button: Tapping this will start a new recording in the selected draft (Draft 1 in this example).
- Recording Volume Guidance: This horizontal grey bar or band helps you to make a recording with good volume quality. When you are recording, a good volume is indicated by the waveform going above and below this grey bar into the white space. Watch this video for more information:
- Trash Can: Tap to delete the audio in the selected draft. Can also be tapped to recover a draft that was recently deleted using the Trash Can.
- Next button: Proceeds to the Draft Select screen where you select which draft you will push forward in the workflow.
The following images show examples of recordings with A) good recording volume, B) bad recording volume (the audio input volume is too low), and C) bad recording volume (the audio input volume is too high).
A - GOOD: Some of the wave goes into the areas identified by the yellow arrows
B - BAD: None of the wave goes into the areas identified by the yellow arrows. The audio input is too low.

C - BAD: Too much of the wave is hitting the upper and lower limits. The audio input is too high.

Notice the upper (tall) and lower (short) waveforms. The lower waveform shows the entire recording. The upper shows a smaller portion of the recording (up to 30 sec).
Draft: Draft Select
- Drafts: Lists all current drafts. Select the best one to proceed.
- Selector: Tap the circle of the Draft you want to select. It will turn dark blue when selected.
- Next: Tap this to proceed. Render will only save the selected Draft
Draft: Passage Review*
- References: audio of this Passage in each Reference audio Bible
- Play: tap this to play the Draft.
- Note: notes can be made for the Peer team who will check this Draft. Before making a note, find the place in the Draft where you want the note to appear. Tap that location. Then tap the Note button. See the article “How to: Record a Note”.
- Re-record (optional): tap this to return to the Draft Record page and record a new draft (for example, to fix a problem found during this review process).
- Next: Proceed to the final Section Review screen.
If you have more Passages to record within the Section, tapping the Next button will take you to the ‘Draft: Passage Listen’ page for the next Passage.
Draft: Section Review*
When all Passages have been recorded, you will review the entire Section here if Section Review is turned on in the Draft settings:

- References: Each player will play the Reference Bible audio of the entire Section.
- Passages: The screen shows all Passages in the Section (labeled A and B in the image above).
- Re-Record: When a Passage is selected, like Passage 1 in the image above, tapping the Re-record button will take you to the ‘Draft: Draft Record’ page for that Passage.
- Note: notes can be made for the Peer team who will check this Draft. Before making a note, find the place in the Draft where you want the note to appear. Tap that location. Then tap the Note button. See the article “How to: Record a Note”.
- Finished: This is the last step in the Draft stage for this Section. Tapping the Finished button will produce a confirmation popup. Tap the upper icon to confirm that you want to finish this stage. This will complete the Draft work for that Section and take you back to the Project Home page. Tap the X if you want to return to the Section Review screen.

Was this article helpful?
That’s Great!
Thank you for your feedback
Sorry! We couldn't be helpful
Thank you for your feedback
Feedback sent
We appreciate your effort and will try to fix the article